
The Original MWrench E28/E24 Steering Box Bracket Reinforcement
Disclaimer: This is a WELD IN repair ONLY. Reinforcement insert must be welded to the subframe immediately upon installation.
Supplies
MWrench Steering Box Reinforcement kit
3/8” drive socket wrench, 17mm socket, and 17mm box wrench (extensions/swivels may improve process)
Torque wrench
Sanding supplies: Dremel, flap disk, wire wheel, sanding tool, etc.
Welder
Low-gloss black spray paint / powder coat
Red loctite
Overview: On a left hand drive E28/E24 BMW, the steering box mount is located on the driver side of the subframe, and should be visible from both above and below on most cars. Removal of the nut and bolt is typically easiest from below but results may vary. If the steering box bracket has broken, this will be a repair. If the bracket has not broken, this will be a reinforcement.
Note: Welding this part is a necessity. It will likely affect one of the mounting points used to attach the factory European market undertray, although the hole is typically still accessible for use in one way or another.
The following directions are for completing this installation with the subframe in the car, either on a lift by an automotive shop or on jack stands by a competent home mechanic. If this process is being carried out on a subframe out of the car, the steps will be more streamlined.
Installation
*For sake of ease, we will henceforth be referring to the machined steel steering box reinforcement as an insert.*
1. Locate & remove: Locate, loosen, and remove the through-bolted nut & bolt attaching the steering box to the mounting bracket on the subframe.


2. Inspect: The bracket was originally welded on two sides. If the bracket has not broken free of the subframe, leave it in place. If the bracket has completely separated from the subframe, it should be removed.
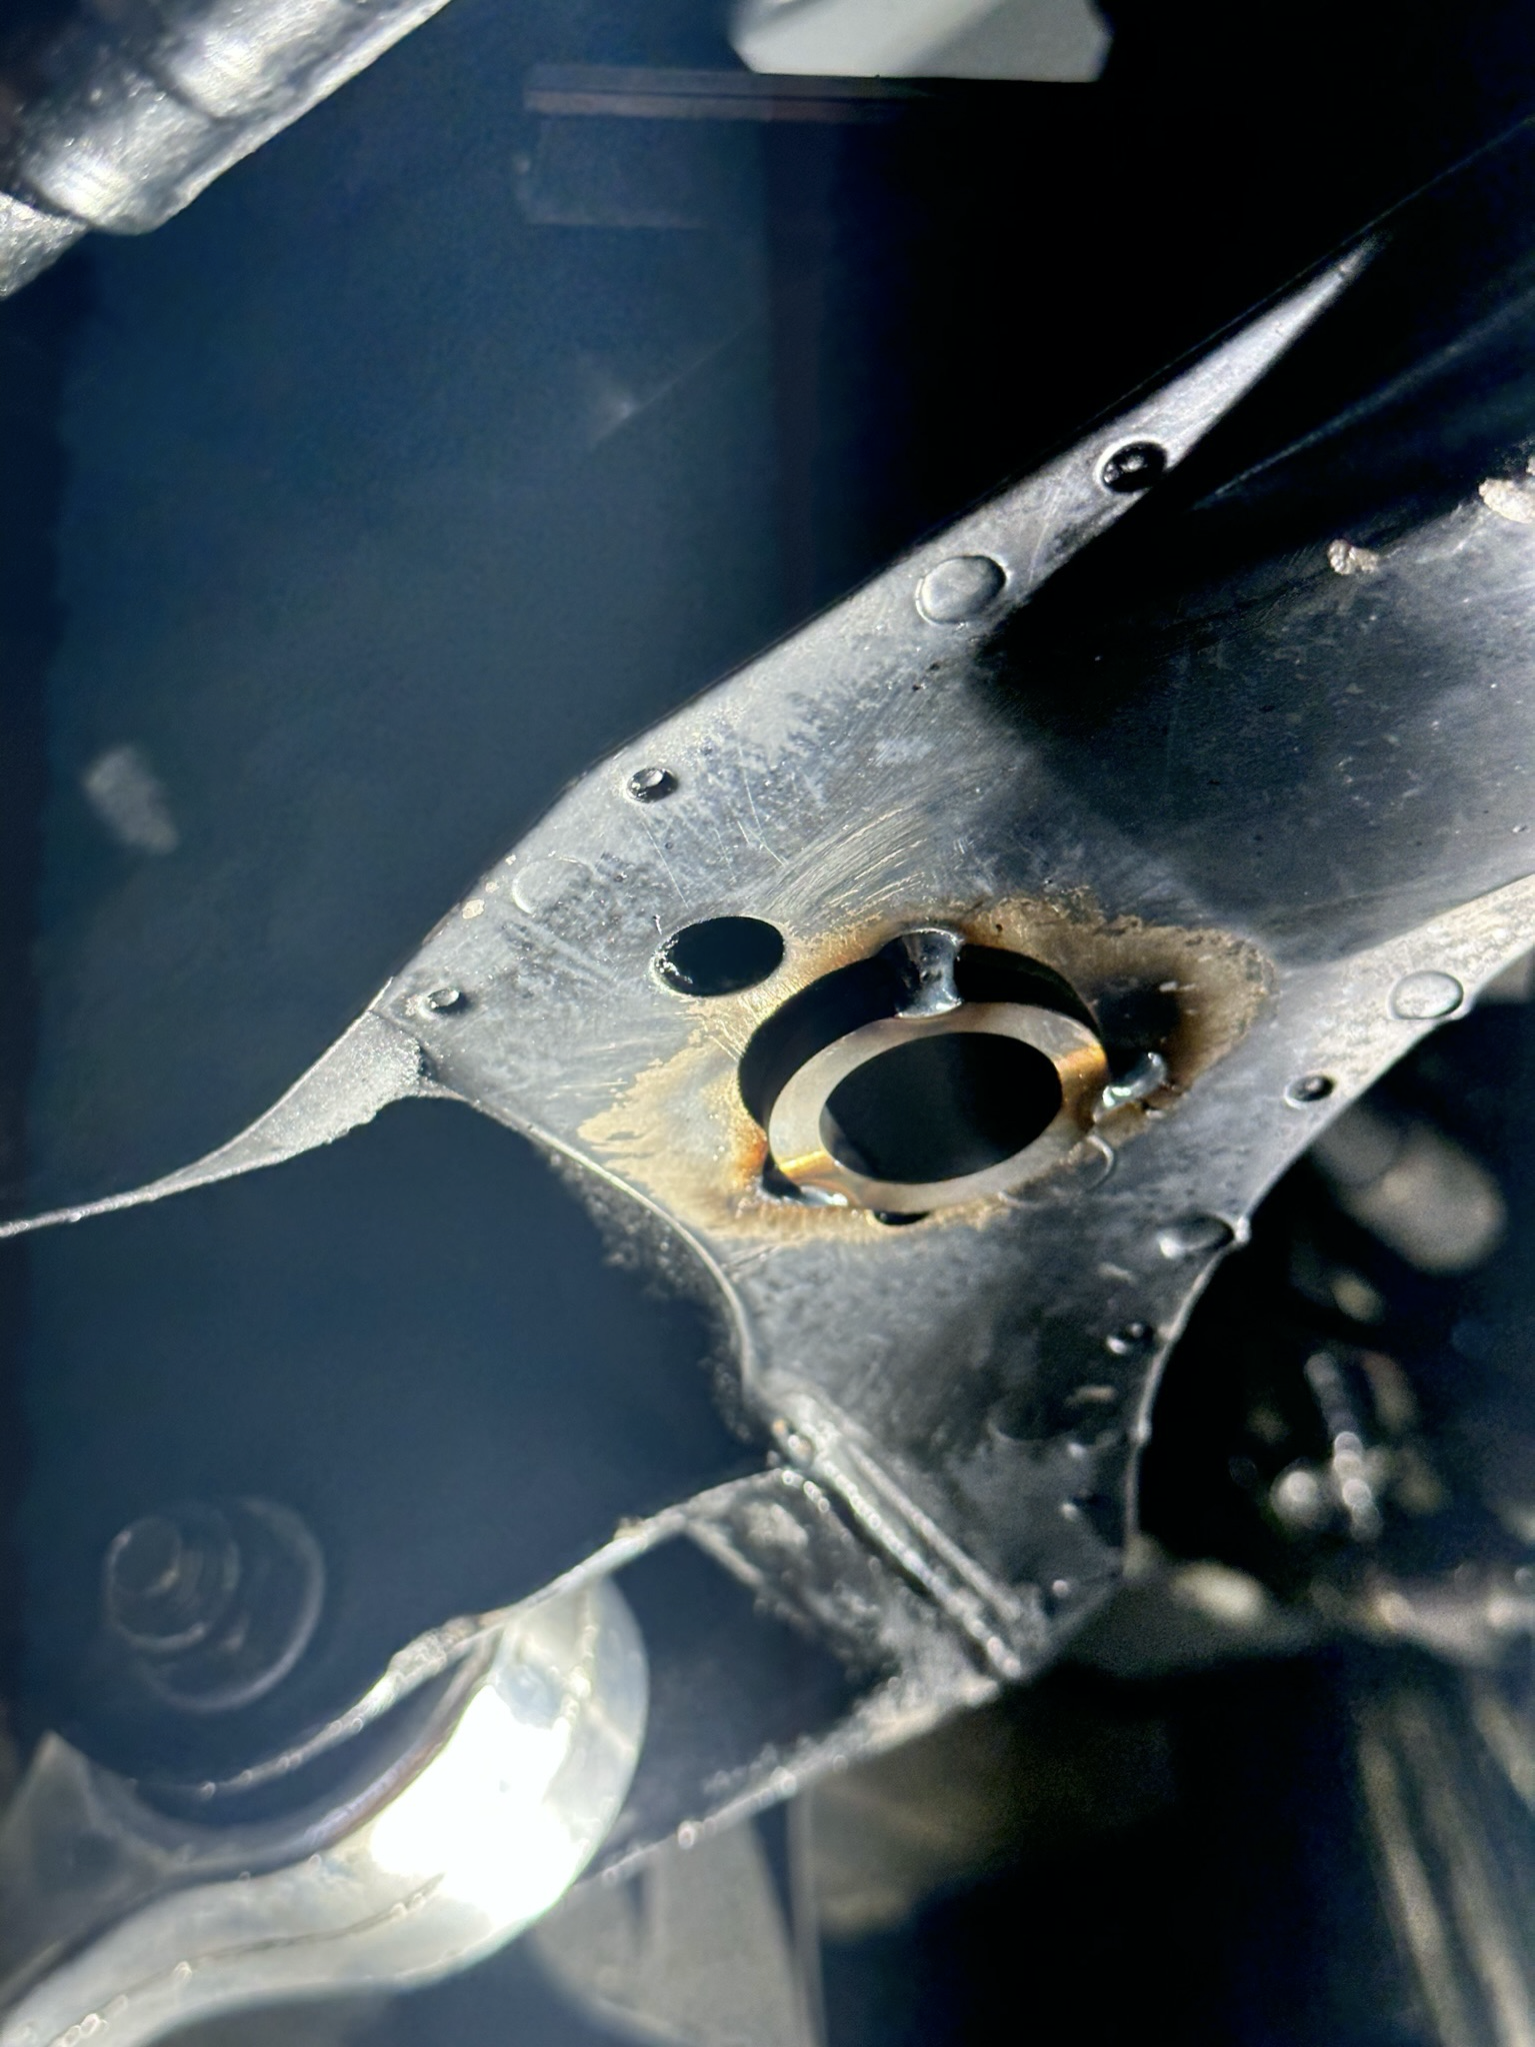
3. Test fit: From the underside of the car, install the insert into the through-hole in the subframe under the steering box bracket. A round file or die grinder may be needed to clear the holes depending on subframe condition, past weld repairs, etc. Be careful not to remove any material from the sub-frame and keep the holes the original size. Remove the insert from the subframe.


4. Surface Prep: On the underside of the subframe, clean away road grime then sand the paint off from around the hole to create a good surface for welding. A prepped area of ~3/4”/19mm around the hole is sufficient. A small pneumatic or electric sanding tool can make quick work of this step. Use personal protective equipment as recommended by the tool manufacturer.


5. Fixturing Insert for Welding:
a. Steering box bracket in place: If the original steering box bracket has not broken, feed the insert up through the bottom side of the subframe to the steering box bracket. Do not install the supplied large washer, the washer makes up the difference of stack height if the bracket is not present. Install the bolt with the supplied split washer from the top down through the steering box bracket. Thread the bolt into the insert until the insert pulls flat to the subframe. Do not final torque. See step 8 for final torquing directions.
b. Steering box bracket removed: Feed insert up through the bottom side of the subframe up to the steering box bracket. Place the large diameter washer between the top of the insert and the steering box bracket; the washer makes up the difference of stack height if the bracket is not present. Install the bolt with supplied split washer from the top down through bracket and large washer. Thread the bolt into the insert until the insert pulls firmly flat to the subframe. Do not final torque. See step 8 for final torquing directions.


6. Welding: This kit is designed to be installed and welded in one complete process. Failure to weld the insert will result in the bolt backing out and the insert falling out. Weld the entirety of the outer shoulder of the insert to the subframe, so that the insert is solidly affixed to the subframe. It is not necessary to weld the insert on the topside where it exits the subframe; this task is easiest if the bracket is broken and subframe is removed. If one does not possess welding equipment, we recommend having the car towed to a shop capable of welding the part. The Studio is not liable for any damage caused by failure to properly install & weld the insert. Nor is The Studio liable for any damage caused by installation or welding which could lead to part failure or injury.


7. Paint Touch Up: While the weld is cooling, spray some paint on the exposed steel on the subframe and insert. We typically use a low-gloss black high-temp engine enamel for this portion. We have also had multiple subframes powdercoated after the reinforcement was welded with the subframe out of the car.


8. Finishing the job: Once the weld has cooled, remove the bolt & split washer, put red Loctite on the bolt. Making sure to maintain the washer/bracket stack relating to the condition of your bracket(5a vs 5b), reinstall the bolt & split washer and tighten to 55 ft/lbs. Congratulations! You’ll never have to worry about your steering box bracket failing again.

Footnote:
This kit was engineered by Ed Raether out of necessity in the ‘90s, when the bracket on his subframe sheared just one week after purchasing his E24 M6. Since then, Ed’s “MWrench” kit has improved the functionality of thousands of E24 & E28s. Living locally to Ed, we began meeting him in person to purchase our steering box reinforcements over a decade ago. Now, after installing more than ten on our personal cars over the years, as well as many more on client cars, we’re honored to have Ed grant us rights to continue production of this great piece! The inserts are made in the same San Jose, California- based machine shop that Ed used from the early 2000s until his last batch before handing us production rights. Our kit’s hardware is identical to Ed’s final rendition, other than our use of yellow zinc hardware, because we appreciate a little presentation pop! We have a long history in the classic BMW community, and we’re excited to carry on Ed’s legacy & product, and preserve the driving experience of these classic BMWs!